
Last Updated on September 6, 2021 by admins
Looking for a way to make your big day extra special? Wanting to make it more personal? Knowing how to make corsages for weddings is a great way to add your own touch to your wedding day.
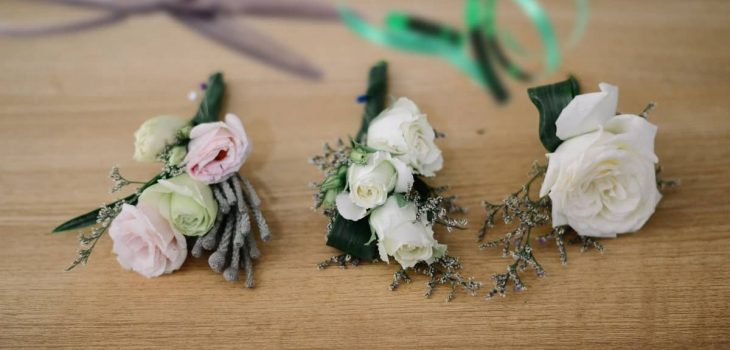
Corsages add an elegant touch to any wedding. They can be a lovely addition for the mother of the bride, mother of the groom, and even the bridesmaids to wear. They can get expensive to buy, however, you can easily make your own ones at home.
The corsage can easily be transformed into a boutonniere as well. Boutonnieres are great for the groom, groomsmen, father of the groom, and father of the bride to wear.
What Is a Corsage?
A corsage is a small arrangement of flowers that is traditionally worn on the wrist or on clothing. They are worn for formal events and are generally worn by women.
Corsages are often worn at homecoming and prom dances. However, they can also be worn at weddings or other formal events. They can also be worn by men and are known as boutonnieres. Instead of being worn on the wrist, boutonnieres are pinned to a suit jacket.
What You Need to Follow This Tutorial for a DIY Wedding Corsage

Equipment
For how to make corsages for weddings, you will need:
- Garden shears
- Floral tape
- Floral wire
- 1/4 Ribbon
- Pins
- Flowers
- Foliage
- Hot Glue
- Card stock
- Bracelet or 2-inch ribbon
Step by Step Instructions: How to Make Corsages for Weddings
Step One: Trim Flowers and Floral
Using your garden shears, trim your flowers and floral so they are around four inches in length. Trim the bottom if the stems of greens and leaves so they don’t get in the way of the tape.
Step Two: Wrap the Flowers and Floral
Arrange the flowers and floral to your liking. Tape the focal flower and floral, leaving a bit of the end exposed. then add more layers of flowers and floral to your liking, taping with each layer.
Make sure that the tape is snug. If needed, you can add floral wire to help the flowers stand up straight.
Step Three: Trim the Stems
Once you have finished arranging your corsage, trim the stems so they are even. Leave a small amount of stems at the bottom.
Step Four: Wrap the Stems
With your 1/4 inch ribbon, wrap the stems of your corsage. Start wrapping at the bottom of your tape and keep wrapping until the top of the stems.
Tie off the end of the ribbon in a knot and trim off any excess. If needed, tuck the end of the knot into the ribbon to hide. You may also use pins to help secure the ribbon as well.
Step Five: Prepare Ribbon Wristband
Cut a piece of your 2-inch ribbon that is approximately two feet long. Cut a small piece of card stock that is about two inches long and one inch wide. Using a hot glue gun, glue the piece of card stock approximately three inches from the start of the ribbon.
Step Six: Attach the Flowers
Carefully glue the flower arrangement to the card stock piece on the ribbon. Hold it down for a few seconds to dry. Then, tie the ribbon on your wrist and have someone trim off the extra ribbon.
In addition to attaching the corsage to a ribbon wristband, you can also use a bracelet instead. Attach a 1/4 inch of ribbon to your bracelet then use it to tie your flower arrangement to the bracelet to create a corsage.
Tips and Tricks
When making your corsage, you can use any type of flower you like. The most popular flowers to use are roses, carnations, lilies, and orchids. You can use all the same type of flower or a variety of flowers.
For the foliage that is used as fillers, baby’s breath, eucalyptus, solidago, and chamomile are commonly used. Most people use two to three different types of foliage when making their corsage.
You can make your corsage as large or small as you like. Some people prefer large corsages with two to three flowers and lots of foliage. On the other hand, some people prefer only one flower with just a few pieces of foliage.
To make your corsage into a boutonniere, follow the steps of making a corsage until step four. Once your flower arrangement is wrapped in ribbon, stick a couple of pins in the ribbon. Then, use the pins to attach the boutonniere to your suit jacket.

When making the corsage, it is best to wait till the day before or the day of the wedding to make. This will help keep the flowers fresh and help ensure they still look good by the time of the ceremony.
Though it is traditional to use real flowers to make a corsage, you can use fake ones if needed. Fake flowers are a great option for those who are allergic to flowers. In addition, you don’t have to worry about the flowers wilting.
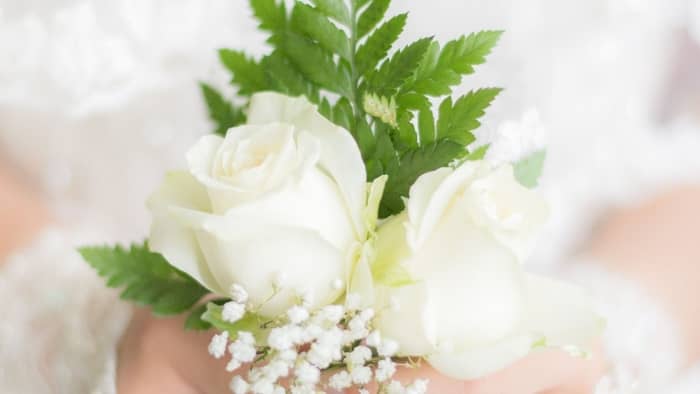
How to Make a Wrist Corsage for Your Wedding
Knowing how to make a wrist corsage with ribbon is a great skill to have for your wedding. A corsage will be an elegant touch for the mother of the bride and mother of the groom to wear. It is even a great option for the grandmothers or even the bridesmaids to wear.
In addition, you can easily transform a corsage into a boutonniere. A boutonniere is a great touch for the groom and groomsmen to wear. In addition, they can also be worn by the father of the bride, father of the groom, and grandfathers.
Do you have any questions on how to make corsages for weddings? If so, please ask any questions about making corsages down below and in addition, share this post with anyone else you may think will enjoy it.
Read more about Making Your Own Chuppah.