
Last Updated on September 6, 2021 by admins
If you want an elegant and unique look for your wedding, a birdcage veil is a wonderful option. Knowing how to make birdcage veils will allow you to get the exact look you are wanting. They provide a lovely look that is perfect for any type of wedding.
The great thing about making your own birdcage veil is that you can do it for a budget-friendly price. Even if you don’t have any prior sewing experience, you can still master making one. It is a great DIY project if you are wanting to make your big day even more personal.
What is a Birdcage Veil?
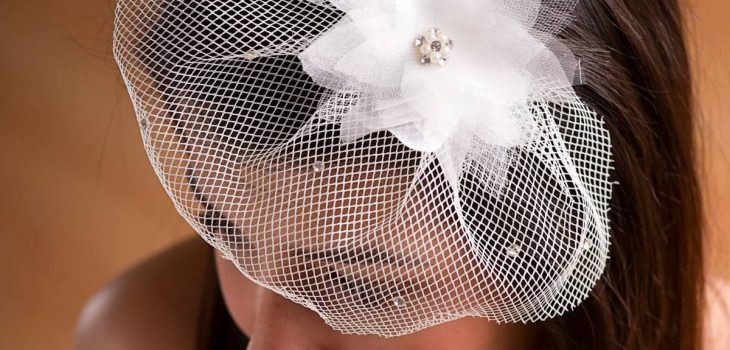
A birdcage veil is a short type of veil that covers part or all of the face. It got its name as once it is on your head, the fabric forms a hanging birdcage shape. They are often made from Russian net, translucent tulle, or French netting and can contain embellishments as well.
Birdcage veils first became popular during the 1940s due to the lack of materials from WWII. They became a popular trend in the 1940s and 1950s. Now, they are a popular style when people want a retro look for their wedding.
What You Will Need to Follow This DIY Birdcage Veil Tutorial


Equipment
For making your own birdcage veil, you will need:
- 16–18” of French netting
- 10–12” of 1/4” ribbon
- Wire hair comb
- White thread and needle
- Scissors
- Measuring tape
- Embellishments such as feathers, rhinestones, pearls, or flowers (optional)
- Hot glue gun (optional)
Step by Step Instructions
Step One: Measure Out the Netting
Measure out your 9″ French netting until it is 16-18 inches long, depending on your personal preference. Cut the netting and trim the edges if desired.
Step Two: Shape the Netting
Carefully fold the veil in half and trim one of the corners diagonally at about a 45-degree angle. Make sure to measure the edge you just cut while it is still folded along your face to make sure it hits the right spot. If need, trim more off to reach your desired size.
Step Three: Sew the Netting
Open up the netting then take your needle and thread and stitch along the uncut side of your veil. When you get the end, pull the thread so it scrunches up. Make sure you adjust the length so it matches the length of the comb then tie a knot in the thread.
Step Four: Wrap the Comb
Wrap the comb with your ribbon, starting by wrapping it on one end of the comb through the teeth and then tie a knot. Continue wrapping the ribbon through the teeth and when you get to the other end, tie a knot. Trim off any excess ribbon is needed.
Step Five: Sew Your Veil to the Comb
Once you are finished wrapping your comb, sew it together with your veil. If desired, you can also attach it using hot glue. If using hot glue, use a binder clip to hold the veil and comb together as it dries.
Step Six: Attach Embellishments
Once your birdcage veil is assembled, you can attach any embellishments you desire. Using your hot glue gun, you can attach rhinestones, feathers, pearls, or flowers to the comb. Allow them to thoroughly dry before wearing the veil.
Tips and Tricks
Instead of using a metal hair comb, you can use a headband instead. Using a headband is a great option if you have shorter hair. You can use headbands that already have embellishments on them to create a showstopping piece.
You can use any color of ribbon for attaching to the comb. Silver, gold, and white are popular and elegant colors to use. In addition, you can even use one of your wedding colors to create a personal look.
Since birdcage veils only cover a small area, you can wear them with any hair length or style. This gives you the freedom to wear your hair however you like. You can even style the veil so you can wear it in different ways.

It is best to use a metal hair comb that does not have embellishments on it. This will make it much easier to wrap the ribbon around the comb. After attaching the veil and comb, then you can attach any embellishments to your comb.
If you are having problems with your comb staying in your hair, you can use bobby pins to help keep it in place. Hairspray will also help to keep the veil in place. If you are worried about the comb not staying in place, you can always just use a headband, as it will stay in place better.
How to Make a Birdcage Veil
Making your own birdcage veil is a wonderful way to make your wedding more personal. Not only is it simple to do, but it is also budget-friendly. Some veils can cost hundreds of dollars, but you can make your own special one for under $30.
Birdcage veils are a wonderful option if you are looking for a retro look. They can be worn with all hairstyles and lengths. You can easily add any sort of accessories you want, such as pearls, rhinestones, feathers, or flowers.
No matter your wedding theme or style of your dress, you can find a way to wear a birdcage veil. They are a versatile and simplistic style that it is great for any time of the year.
Even if you aren’t a crafty person, this project is great for beginners. You will love being able to make your veil exactly as you like. All your guests will be impressed that you made such a beautiful veil.
Did you enjoy this tutorial on how to make birdcage veils? If so, please share this post with any other brides-to-be who may enjoy it as well.
Read more about Making Your Own Chuppah