How To Make Birdcage Veils

If you want an elegant and unique look for your wedding, a birdcage veil is a wonderful option. Knowing how to make birdcage veils will allow you to get the exact look you are wanting. They provide a lovely look that is perfect for any type of wedding.

The great thing about making your own birdcage veil is that you can do it for a budget-friendly price. Even if you don’t have any prior sewing experience, you can still master making one. It is a great DIY project if you are wanting to make your big day even more personal.

What is a Birdcage Veil?

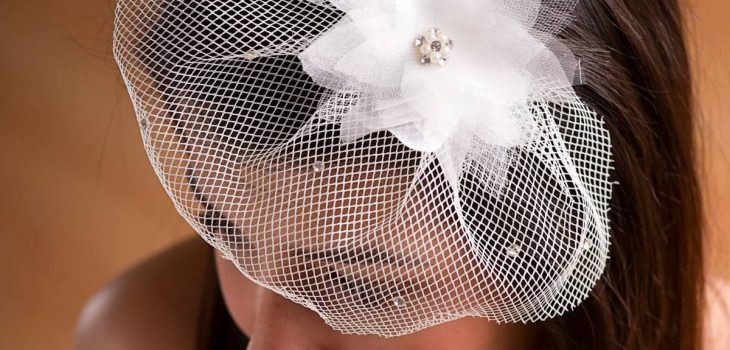
A birdcage veil is a short type of veil that covers part or all of the face. It got its name as once it is on your head, the fabric forms a hanging birdcage shape. They are often made from Russian net, translucent tulle, or French netting and can contain embellishments as well.

Birdcage veils first became popular during the 1940s due to the lack of materials from WWII. They became a popular trend in the 1940s and 1950s. Now, they are a popular style when people want a retro look for their wedding.

What You Will Need to Follow This DIY Birdcage Veil Tutorial

Equipment

For making your own birdcage veil, you will need:

  • 16–18” of French netting
  • 10–12” of 1/4” ribbon
  • Wire hair comb
  • White thread and needle
  • Scissors
  • Measuring tape
  • Embellishments such as feathers, rhinestones, pearls, or flowers (optional)
  • Hot glue gun (optional)

Step by Step Instructions

Step One: Measure Out the Netting

Measure out your 9″ French netting until it is 16-18 inches long, depending on your personal preference. Cut the netting and trim the edges if desired.

Step Two: Shape the Netting

Carefully fold the veil in half and trim one of the corners diagonally at about a 45-degree angle. Make sure to measure the edge you just cut while it is still folded along your face to make sure it hits the right spot. If need, trim more off to reach your desired size.

Step Three: Sew the Netting

Open up the netting then take your needle and thread and stitch along the uncut side of your veil. When you get the end, pull the thread so it scrunches up. Make sure you adjust the length so it matches the length of the comb then tie a knot in the thread.

Step Four: Wrap the Comb

Wrap the comb with your ribbon, starting by wrapping it on one end of the comb through the teeth and then tie a knot. Continue wrapping the ribbon through the teeth and when you get to the other end, tie a knot. Trim off any excess ribbon is needed.

Step Five: Sew Your Veil to the Comb

Once you are finished wrapping your comb, sew it together with your veil. If desired, you can also attach it using hot glue. If using hot glue, use a binder clip to hold the veil and comb together as it dries.

Step Six: Attach Embellishments

Once your birdcage veil is assembled, you can attach any embellishments you desire. Using your hot glue gun, you can attach rhinestones, feathers, pearls, or flowers to the comb. Allow them to thoroughly dry before wearing the veil.

Tips and Tricks

Instead of using a metal hair comb, you can use a headband instead. Using a headband is a great option if you have shorter hair. You can use headbands that already have embellishments on them to create a showstopping piece.

You can use any color of ribbon for attaching to the comb. Silver, gold, and white are popular and elegant colors to use. In addition, you can even use one of your wedding colors to create a personal look.

Since birdcage veils only cover a small area, you can wear them with any hair length or style. This gives you the freedom to wear your hair however you like. You can even style the veil so you can wear it in different ways.

Birdcage veils should be worn at the crown of your head. This allows the net to fall forward across your face. Ideally, it should lay just above the tip of the nose or along the line of your cheekbone.

It is best to use a metal hair comb that does not have embellishments on it. This will make it much easier to wrap the ribbon around the comb. After attaching the veil and comb, then you can attach any embellishments to your comb.

If you are having problems with your comb staying in your hair, you can use bobby pins to help keep it in place. Hairspray will also help to keep the veil in place. If you are worried about the comb not staying in place, you can always just use a headband, as it will stay in place better.

How to Make a Birdcage Veil

Making your own birdcage veil is a wonderful way to make your wedding more personal. Not only is it simple to do, but it is also budget-friendly. Some veils can cost hundreds of dollars, but you can make your own special one for under $30.

Birdcage veils are a wonderful option if you are looking for a retro look. They can be worn with all hairstyles and lengths. You can easily add any sort of accessories you want, such as pearls, rhinestones, feathers, or flowers.

No matter your wedding theme or style of your dress, you can find a way to wear a birdcage veil. They are a versatile and simplistic style that it is great for any time of the year.

Even if you aren’t a crafty person, this project is great for beginners. You will love being able to make your veil exactly as you like. All your guests will be impressed that you made such a beautiful veil.

Did you enjoy this tutorial on how to make birdcage veils? If so, please share this post with any other brides-to-be who may enjoy it as well.

Read more about Making Your Own Chuppah
Making Your Own Chuppah

Making your own chuppah for your wedding can be a wonderful way to make your big day more special. You are able to make it personal to you and your significant other. You will also have the satisfaction of knowing you and your spouse built it yourselves.

Building your own chuppah will allow you to add any special touches that you like. You can add your favorite types of flowers to give it a more romantic vibe. In addition, you can even make it based on your wedding colors for a more special look.

What is a Chuppah?

A chuppah is traditionally a canopy that a Jewish couple will stand underneath as they get married. Oftentimes it consists of a sheet that is supported across four poles. It is open on all four sides and is used for both indoor and outdoor weddings.

Though many synagogues have a chuppah, some people may opt to use their own for a more personal feel. In addition, if someone is having their wedding outside, it may be easier to build one rather than rent one.

Though some people prefer to stick with the traditional style of a chuppah, others prefer to be more creative. It has become a trend to add fresh flowers to create a more personal and romantic look.

How to Build a Chuppah

Fortunately, building a chuppah doesn’t have to be hard. You can make your own beautiful special for your big day. Before you get started, make sure to measure the space to make sure there is plenty of room for your chuppah.

Next, you will want to make sure that the parts you buy are big enough. Make sure to select tall poles, at least right feet, and a cloth top that will be plenty big. Some people even opt to use a tallit.

Equipment

  • four patio umbrella stands
  • screw hooks
  • level
  • cloth top
  • flowers (optional)
  • flower wire (optional)

Assembling Your Chuppa

Once you have all your equipment, it is time to assemble your chuppa. You want to assemble it right at the location of your wedding ceremony, as it will be difficult to transport. Ideally, you will want at least one person to help you with the process to ensure it goes smoothly.

The chuppa can be assembled a couple of days ahead of your wedding, but you want to wait to add the flowers till the day of. Make sure that your wedding venue is alright with you building your own chuppa before you get started on the project.

Place the Patio Umbrella Stands

First, place down your patio umbrella stands. Using patio umbrella stands allows for an easy assembly that will be sturdy.

Measure out the size of your cloth and space them a couple of inches shorter than the length of it. This will allow the cloth to have a slight droop instead of being too tight.

Instead of umbrella stands, you can use flag pole stands instead. Just make sure that whatever you choose can be adjustable.

Add the Screw Hooks to the Birch Poles

Carefully add the screw hooks to the top of the birch poles. This will allow you to easily attach your cloth.

Add the Birch Poles to Your Umbrella Stand

Once you have your umbrella stands placed in their spots, add the birch poles. Carefully lower the pole into the umbrella stand and tighten them until they are secure. You can use a level to make sure your DIY chuppah frame is straight.

Add the Cloth Top

Once the birch poles are level and securely in place, add the cloth to the top. Use the hooks to attach the cloth, making sure that it is not too tight. If needed, you can tie string to the cloth and then to the hooks to attach it securely.

Be sure that the cloth is securely fastened. If it is an outdoor wedding, you don’t want it to blow away if it gets windy out.

Attach Flowers if Desired

If desired, you may decorate your chuppah with flowers. Flower wire is a great way to attach flowers to your chuppah. Stock flowers, Lisianthus, hydrangeas, and orchids all will look beautiful on it and give it a lovely appearance.

In addition to flowers, you can also add foliage. Willow and Eucalyptus add an elegant touch that will make for a beautiful statement piece.

Feel free to add the foliage and flowers anywhere you want on the chuppas. You can add it anywhere on the birch poles or on the umbrella stands.

When adding flowers, wait to add them till the day of the wedding. This will help ensure they won’t wilt and dry up ahead of time, leading to a lackluster chuppa.

Instead of floral wire, or in addition, you can use ribbon to attach the flowers. You can use ribbons of your wedding colors to make for a more personal look.

Making Your Own Chuppah That is Beautiful and Elegant

Knowing how to make a chuppah is a wonderful skill to have if you plan to have a Jewish ceremony. Though you can always borrow one or buy one, making your own is more special. It gives you the freedom to customize it to the style of you and your spouse.

In addition, you can take pride in knowing that you built part of your wedding ceremony. You and your significant other can do this project together to make it even more special. Building it is easier than you think and your guests will be impressed to know you did it.

By using birch poles and patio umbrella stands you can easily create a sturdy yet beautiful frame for your chuppa. With the addition of screw hooks, you can securely add your cloth on top. Then, you can add flowers, foliage, and ribbon to create a personal and elegant look.

Do you have any questions regarding making your own chuppah? If so, please ask any questions regarding chuppahs and how to build one down below.

How To Serve Alcohol At A Wedding Without A Bartender

Many people choose to serve alcohol at their wedding. If you choose to, you will want to know how to serve alcohol at a wedding without a bartender. This will help you decide if you want to use a bartender or do it all on your own.

It can be stressful trying to plan all the details of your wedding. Fortunately, you can save some stress by preparing ahead of time and planning how you will serve alcohol. With the right steps, you can serve alcohol at your wedding without a bartender without any stress.

Self-Serve Bar at Wedding

Having a self-serve bar at your wedding can be a practical option. It can save you money from having to hire a bartender, which can get expensive.

Though a DIY wedding bar might not be for everyone, it is a great choice if you are on a budget or are having a small wedding. In addition, it allows you to pick out the exact drinks that you want. It will help reduce waste and any leftover drinks you can keep.

Stick With Beer, Wine, Champagne, and Canned Cocktails

To keep things simple, it is best to stick with beer, wine, champagne, and canned cocktails. These drinks are all self-serve, so you don’t have to worry about people making their own drinks or having to find someone to make drinks all night.

Canned cocktails are a great alternative to mixed drinks. They require no mixing as they are already made. Though you can opt for someone to make mixed drinks, it will be much easier to just stick with canned cocktails.

Make sure that you have plenty of glasses available for people to pour the wine and champagne. It is often a good idea to stick with plastic cups since that will make for a much simpler clean-up. You can even provide markers so people can write their names on their glasses.

If you are planning to serve wine with corks, make sure to provide wine openers. You may want to opt for screw-off tops if you are worried about people having to take off corks. In addition, make sure you have bottle openers if your beer bottles are not twist-offs.

Ideally, you will want to have a small variety of options. Try to have at least one selection of red wine and one selection of white wine. For beers, having two to four different types offers good variety. You can serve different selections such as IPAs and lagers.

For canned cocktails, you can stick with the classics such as margaritas, vodka sodas, sparkling seltzers, and Moscow Mules. There are plenty of different canned cocktails you can serve based on your taste.

Place a Couple Bottles of Wine at Each Table

For serving wine, you can place a couple of bottles at each table along with glasses. This makes it easy for the guest so they have the wine available right at the table. If needed, be sure to provide a wine opener as well.

You can place the wine in holders or in small buckets on the table. This will make it look neat and give it a lovely appearance.

Place Alcohol in a Large Trough With Ice

For your beer and canned cocktails, you can place them in a large trough filled with ice. This allows for convenience and will keep the drinks cold all night.

You can even get decorative troughs that will look nicer than having just a normal cooler. Depending on the weather, you may need to have someone replace the ice if it begins to melt. You can do one large trough or a couple of small ones.

Buying Alcohol in Bulk

If you are planning to serve alcohol at your wedding without a bartender, buying in bulk is a great option. It can save you money, as some places offer discounts for bulk sales. In addition, it allows you to get the exact type of alcohol that you want.

You can buy in bulk at nationwide chains such as Total Wine, Sam’s Club, and Costco. In addition, you can check with your local liquor store to see if they have any specials for buying in bulk.

Before buying, be certain to figure out how much alcohol you need. For casual drinking, plan for two drinks per person for the entire night. For more of a party atmosphere, plan for two drinks an hour at your reception per guest.

Check Your State and Venue’s Liquor Laws

Before you plan your wedding bar setup, be sure to check your state’s laws on serving alcohol. The laws vary by state, so it is important you meet your state’s laws so you don’t end up in any legal trouble. Depending on where you live, you may even have to get a liquor permit for the day.

In addition, be certain to check with your venue on their rules regarding alcohol. Some venues will only allow alcohol to be served by someone with a liquor license. Some places may require a professional bartender to be used due to liability issues and some venues have their own bartenders that must be used if serving alcohol.

Before you get planning on your DIY bar at your wedding, be sure to verify the state laws and venue rules. You don’t want to purchase a bulk amount of alcohol only to find out your venue will not permit outside alcohol.

Self-Serve Alcohol at Your Wedding

Having self-serve alcohol at your wedding can be a great option if you are on a budget or have a small guest list. To keep things simple, you want to stick with wine, beer, champagne, and canned cocktails.

Serving the wine and champagne at the tables and the beer and cocktails in a trough with ice will allow for convenience. Be sure to provide glasses as needed, as well as wine and bottle openers.

Do you have any questions on how to serve alcohol at a wedding without a bartender? If so, please don’t hesitate to ask any alcohol-related questions down below.

Read more about How To Tape Breast For A Backless Dress.

How To Tape Breast For A Backless Dress

Did you buy a stunning new dress for a special event? Does a traditional bra not work with the design? If so, you will want to know how to tape boobs for a backless dress.

Taping your breast is a great alternative to wearing a bra if you have a strapless or open-back dress. Once you get the hang of it, it can be a simple solution when wearing a formal dress. Tape can provide support and coverage without you having to worry about it showing.

How to Tape Your Breast for a Dress: What You Need to Follow This Tutorial

Equipment

For taping your breast for a backless dress, you will need:

  • Boob tape
  • Scissors
  • Cotton balls
  • Dress

Step by Step Instructions: How to Tape Boobs for Strapless Dress or Backless Dress

Step One: Wash Your Body

Prior to taping your skin, wash your body. The tape will stick much better to clean skin.

Step Two: Cut Your Tape

Cut three to four 12-inch long strips of boob tape. Set the stripes of boob tape aside so you can easily grab them.

Step Three: Tape Your Breasts

Carefully grab each of your breasts and push them together. Begin adding the tape across your boobs horizontally, bringing the tape higher or lower depending on your dress.

Add cotton balls to cover your nipples for additional protection and then continue taping. If needed, add more than four pieces of tape.

Step Four: Try on Your Dress

Once you are done taping, try on your dress. Trim and adjust the tape if needed to fit your dress.

Read more about How To Make Corsages For Weddings.

Step by Step Instructions: How to Tape Breasts for Plunging Neckline

Step One: Wash Your Body

Before applying your skin, wash your body. This will allow the tape to stick on better.

Step Two: Cut Your Tape

Measure out your boob tape to make sure it is long enough to go from the bottom of your breast to the back of your shoulder. Cut three to four pieces for each boob.

Step Three: Tape Your Breasts

Lift up your boob and apply the tape to the outer base of your boob all the way up to the back of your shoulder. Apply a cotton ball and add two more strips of tape, starting from the bottom of your breast going up to the top. Repeat the same taping process for your other boob.

Step Four: Try on Your Dress

Try on your dress once you are finished taping. Cut and adjust the tape as needed if any tape is showing.

Step by Step Instructions: How to Tape Your Breasts for a Deep V Dress

Step One: Wash Your Skin

Prior to taping, wash your skin to remove any natural oils. This helps the tape to stick more securely.

Step Two: Cut the Tape

Cut the tape so it is long enough to reach the bottom of your breast to the top of your collarbone. You will need three to four strips for each breast.

Step Three: Tape Your Breasts

Lift up your boob and start taping from the bottom of your outer breast to the top of your collar bone, creating a slight curve when taping. Place a cotton ball on the top of your nipple and add two to three more pieces of tape, curving each piece outwards. Repeat the taping process with your other breast.

Tips and Tricks

For best results, avoid applying lotion or oil to your skin before applying the tape. In addition, you should apply one piece of tape to an inconspicuous spot on your skin before taping. This will allow you to see if you have any sensitivity to the tape you are using, as some people have adverse reactions to ingredients used in tape.

In addition to boob tape, you can also use athletic tape, double-sided apparel tape, or gaffer tape. All of these types of tape will provide proper support while being safe to use on your skin. Avoid using duct tape, scotch tape, and electrical tape on your skin.

Boob tape is specifically designed to tape breasts for dresses. It comes in different skin tone colors so you don’t have to worry if a bit of it ends up showing. It is sturdy while not being uncomfortable and is generally easy to take off.

Once your event is over, you can remove the tape. If you are having difficulties peeling the tape on you can draw a hot bath and get in with the tape, as this will allow it to come off easier. In addition, you can also use some olive oil to remove the tape as well.

You want to avoid your tape being too tight or loose. The tape should be firm but also not uncomfortable. Some people need to adjust to the feeling of wearing tape, whereas other don’t mind how it feels.

It may take some time to get the method of taping down. It is a good idea to practice taping a couple of times before your event. This will help you get the hang of taping to ensure that it will stay in place.

The Benefits of Taping Your Breasts for Dresses

From backless to plunging necklines, dresses come in many different beautiful designs. However, not all of these designs are practical to wear with bras. Fortunately, tape can be a great solution for providing support and lift when bras are not an option.

Though boob tape is often the best choice, gaffer tape, athletic tape, and double-sided apparel tape will also work great too. Just be sure to apply a piece to your skin prior to your event to make sure the tape isn’t irritating your skin. It may take some practice to get taping your boobs just right, but it will super helpful once you get it right.

Did you enjoy this tutorial on how to tape boobs for a backless dress? If so, please share any questions or thoughts about taping in the comment section down below and share this article for others who may find it helpful.

Read more about Best Time Of Day To Have A Wedding.

Exit mobile version